Automated Network Inventory Software PXE Wiki
PXE based automated Network PC Inventory and Windows Imaging Cloning
Brought to you by:
imrankhanawan
NIS has been redeveloped to allow Windows OS image capturing and deployment to bulk laptops / desktops. IT industry is moving away from traditional BIOS based system to UEFI based technology. Both technologies has significant differences.
NIS has been developed to cater for both BIOS and UEFI based systems.
The goal is to deploy Windows OS image to several machines automatically without user interaction and without using CDs/DVD/USB. NIS can capture and deploy OS image from and to bulk systems concurrently. You can view progress while capturing and deploying Windows OS image over network. See below a dashboard showing progress of image capturing.
To view youtube video tutorials for image capturing and deployment, click links below.

See below brief introduction.
Please note: Due to difference between BIOS and UEFI systems, both images cannot be deployed on each other. For example, UEFI image can only be deployed to UEFI based system and BIOS image can only be deployed to BIOS based system.
Please note: HDD on the destination machine should be equal in size or large than the machine where master image was prepared. For Example, technicians machine has 250GB HDD, your destination machine CANNOT have HDD smaller than 250GB. However large size HDD on destination machine should work.
See below a general dashboard showing all Inventory, windows os image capturing and windows os image deployment status and progress.

See below NIS Capturing Windows OS generalized and OOBE image over network (detail information)

See below NIS is deploying Windows OS image to several machines concurrently over network PXE Booting.

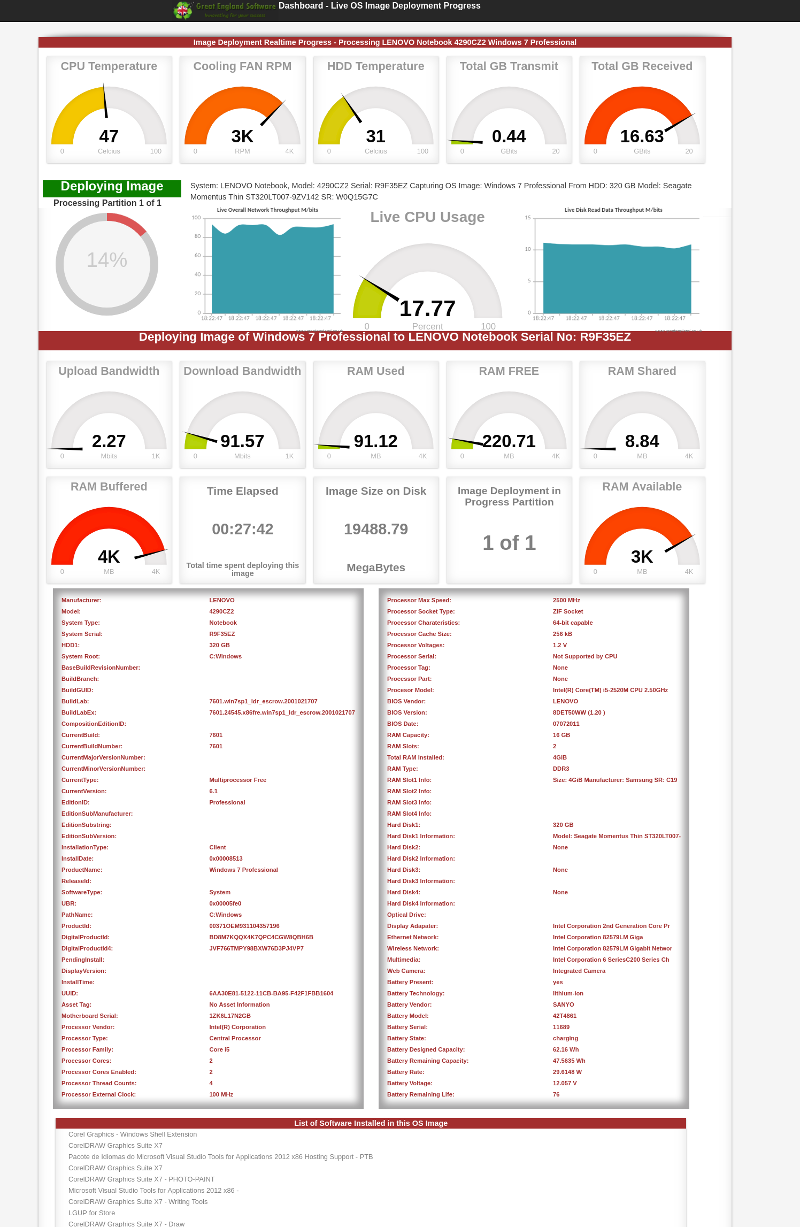
Also see below NIS show comprehensive details for each machine that is deploying windows OS image.
In order to capture the Windows OS image for later deployment to bulk machines, please follow guide below.


Your PC will reboot into audit mode and you may see following on your screen. Do not close any dialog boxes such as System Preparation Tool. See below example image.

At this point you can make sure all drivers are correctly installed, Windows Updates are applied, additional software are installed. You can view the device manager to see which drivers are missing and install any missing drivers.

After installing all drivers, required updates and software, you are now ready to Generalize and convert this image to OOBE.

Make sure OOBE and Generalize option is selected and shutdown the machine. See above image.
Now you are ready to capture this Generalized OOBE image with NIS.
Connect this machine to NIS network and boot into PXE.

Your system will continue to boot and you may see following on the machine screen. See above image.

Press i key and it will start NIS OS capturing and deployment software. See above image.

Press OK to continue. See above image.

Select Capture OS Image from this machine. See above image.

Select the HDD that contains the Windows installation. See above image.

Type the OS image name and hit return, For example: Dell 3510 UEFI Win10Pro 250GB (See above image)

NIS will capture images of all partitions including data, partition tables. This captured image is stored in NIS database real time. You can capture multiple images from bulk machine concurrently.
While OS image capturing is executing on the workstations (PXE booted) machines, You can view realtime and live progress from NIS web management portal. See below a dashboard showing status of all image capturing in progress.
While OS image capturing is still executing on the workstations, you can view detailed information and progress by using NIS web management console for each machine who's image is being captured. See below a real example.
On the client / workstation machine, when image capturing has finished its run, following is displayed.

When image capturing process has completed, you may see following. You may press OK to shutdown this machine.
When image capturing has succeed, you will following on the NIS web management for that specific machine. You can see below, image capturing has finished its run and all guages are silent, this shows image has been captured successfully. You may also notice it also displays comprehensive data related to this image, such as serial numbers, Windows Build, Lab ID, COA, License keys and etc,.

When all partitions and data is captured successfully. You can safely shutdown this machine.
The image that you have just created and captured is now ready to roll out to new machines. You can deploy this image to large number machines concurrently. See next section.
Once you have captured Windows OS image from several machines, you can view details and comprehensive reports by using NIS web management portal. See below image capturing report.

The Windows OS generalized and OOBE image that we have already captured is now ready to roll out to several machines.
Note: The hard disk drive of the destination machine where you are deploying captured image should be equal in size or larger than the source from where original image was captured. Smaller hard disk drive may not work. Also note, BIOS based image can only be deployed to BIOS based system because BIOS and UEFI partitioning system is completely different. BIOS uses MBR and UEFI uses GPT disk tables and they are not compatible. UEFI based image can only be deployed to UEFI systems.
In order to begin deploying Windows 10 image over PXE network using NIS "Automated Network Inventory Software" Connect your machine to NIS network and boot from PXE.
Your system will continue to boot and you may see following on the machine screen. See above image.
Press i key and it will start NIS OS capturing and deployment software. See above image.
Press OK to continue. See above image.
Select Deploy OS Image to this machine. See above image.

Select the image you want to deploy to this machine, this is the image you created earlier, in this case we are going to select Dell_3510_Win_10_UEFI_250GB_HDD.

See above, Image information is displayed for the OS image you have selected, if this is the image you want to deploy continue. Press OK

See above, kindly select the HDD (Hard Disk Drive) where you want to write / deploy this image. In our case it is NVME0N1 250 GB NVME SSD.

Re-confirm your selection and continue, See above.

See above, NIS will first create partition table depending on the type of image and type of system. (Type of partitions are auto-generated depending on BIOS or UEFI system). NIS will then continue to write the image to your destination.
While NIS is writing the Windows OS image to machines, you can view entire networks image writing progress using NIS web management portal. See below a real example of image deployment dashboard.

While NIS is continuing to write the Windows OS image to several / machine(s). You can view detailed information for each deployment task by using NIS web management portal. See below an example show comprehensive details information for image deployment.

See below NIS general dashboard showing real time progress of all image capturing, deployment and inventory overview.

See below another example of NIS showing comprehensive and detail information for image deployment.

When NIS has finished writing the image to workstation(s), you may see following on the client (workstation) where this image is deployed.

After successful Windows OS image deployment, you may see following on the NIS web management portal. Please note status is showing Finished and all guages have dis-engaged, success message is displayed.

After successful image deployment, completion and success message is displayed. Press OK and Enter key to shutdown this machine. See above.
Once image has been written, folllowing message is displayed, you can press OK to shutdown your machine.

Congratulations, you have just finished deploying Windows 10 image to a new machine.
Windows 10 image raw size is approximately between 8GB to 30GB, depending on the number additional window updates and additional softwares, drivers installed. Also depending on the network equipment you have used and hard disk drive throughput performance, if G/Bit switch is used it may take approximately 8 - 20 minutes to deploy the image.
Once you have deployed Windows OS image to several machines, you can view details and comprehensive reports by using NIS web management portal. See below image deployment report.

Should you have support related inquiries, you can post your question in Discussion section for prompt response.
